Uploading a Payroll Contributions File
In this article, we’ll walk through the process for uploading a payroll contributions file within your emergency savings account (ESA) portal. If you have many participating employees or if you are downloading a contribution file from your payroll system for upload into the Vestwell ESA portal, uploading a file may be your easiest approach.
1. Navigate to the “Contributions” Tab on your ESA Portal
After logging into your employer portal and selecting your ESA program on the dashboard, click on the contributions icon on the left-hand side of your ESA portal, as shown below. The contributions tab icon looks like a hand holding a coin. This will bring you to the correct page for uploading your ESA payroll contributions file.
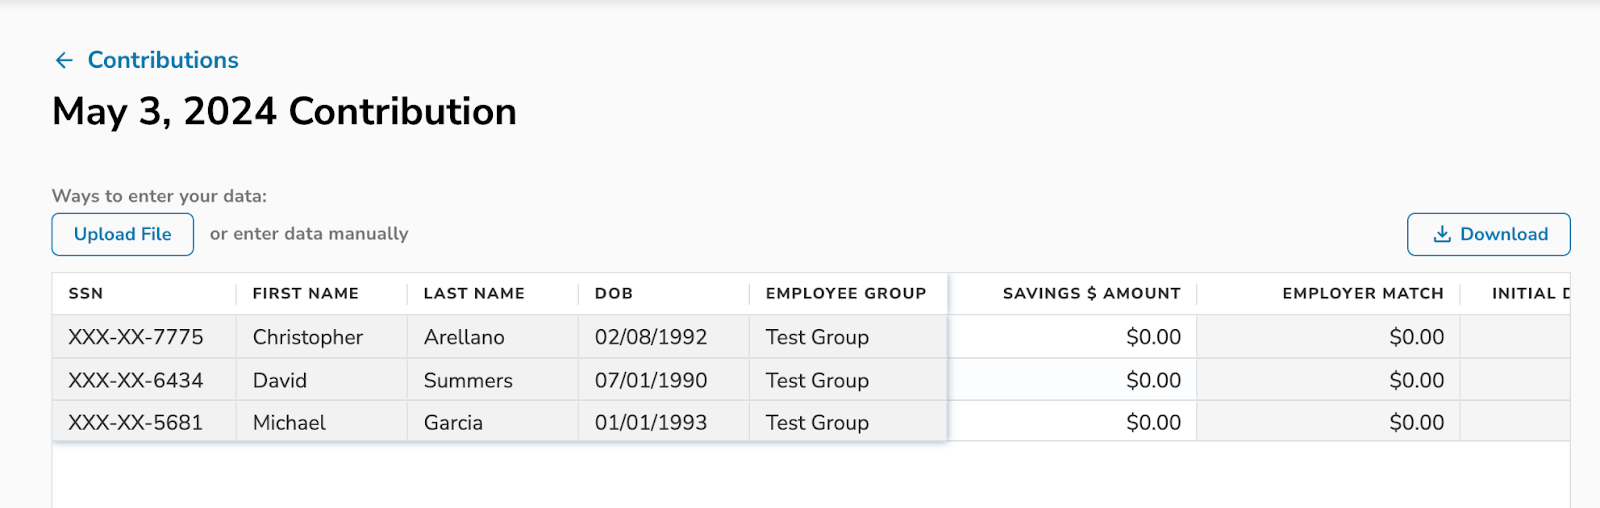
Once you have navigated to the “Contributions” page, click Start Contribution.
2. Use Vestwell’s Template File OR Use Your Own File
You will have two options for how you want to upload your ESA payroll contributions file:
Let’s walk through both options.
Using Vestwell’s Template File
Vestwell’s template file is a pre-formatted and pre-populated template that you can use to easily add in remaining information on your ESA payroll contributions. The template already includes the proper headers and formatting required to upload and process ESA contributions easily. To use Vestwell’s template file, follow these steps:
- Click Download in the upper right-hand corner of the “Contributions” dashboard.

- On your computer, click on the downloaded Microsoft Excel template and open it for editing.
- When you open up this template Excel file, you will see that it is pre-populated with column header names, noted in bold below. It will also be pre-populated with some of the corresponding data for each column as pulled from your census file and program setup details during onboarding. Note that the only employees shown on the template will be currently registered and eligible employees. The following columns will be included and pre-populated with data on the template:
- SSN: Social security number of each employee
- First Name: First name of the employee
- Last Name: Last name of the employee
- Date of Birth: Birth date of the employee
- Employee Group: The employee group for which you have designated this employee. For now, you will only have one employee group for all participating employees.
- Date of Hire: Date the employee was initially hired
- Date of Termination: Date that the employee was terminated
- Date of Rehire: Date the employee was hired if they were employed by the company previously
- Address 1: Employee’s street address
- Address 2: Additional street address data for the employee, if applicable
- City: City of the employee’s address
- State: State of the employee’s address
- Country: Country of the employee’s address (US only)
- Postal Code: Zip code of the employee’s address
- Work Email: Employee’s email address provided by the employer
- External Payroll ID: If used by your payroll provider/HR system, this is an employee ID that could be used in place of an SSN
If you make any edits to this pre-populated employee information in the template, for example, adding a “Date of Termination,” when you upload the template file to your ESA portal, we will ingest these changes and save them in our records.
- There will also be a column labeled “Emergency Savings Contribution” in the template that will not be pre-populated with data. This column requires you to manually enter the corresponding dollar amounts that your employees deduct from their paycheck for their ESA. You can retrieve this information from your payroll system after you run your payroll. Copy over each applicable employee’s savings amount from your payroll system into this column. When you upload your file, the data from this column will show on your portal in a column named “Savings $ Amount.”
- Remember to save your file to ensure all changes you make are recorded.
Using Your Own File
If you are creating your own file or using a file that you retrieved from your payroll system or another source, click Upload File. You will need to ensure your file is formatted and filled in properly to be processed. Follow the below guidelines:
- Ensure your file is in Excel or CSV format.
- Ensure that your file contains the following column headers and data for each participating employee. Listed below are the header names, along with a description of the data required for the respective column. Only certain fields are required for existing employees in your ESA program, while additional fields are required if you are including new employees within your ESA program this pay cycle. This distinction has also been indicated below. You can interpret the below guidelines as per this example: *This tells you whether the column is required for all employees or only for newly added employees* This is the column header name you must use : this is a description of the data you must include in this column for each employee.
- *Required for All Employees* SSN: This is an employee’s social security number, and it can be formatted with or without dashes.
- *Required for All Employees* Last Name: This is an employee’s last name. First and last names must be in two separate columns.
- *Required for All Employees* First Name: This is an employee’s first name. First and last names must be in two separate columns.
- *Required for NEW Employees* DOB: This is an employee’s date of birth. Any valid numerical date format will be accepted, such as mm/dd/yyyy, m/d/yyyy, m/d/yy, or yyyymmdd.
- *Required for NEW Employees* Employee Group: This is the employee group name you have designated during your ESA program onboarding. For now, you will only have one employee group.
- *Required for NEW Employees* Date of Hire: Any valid date format will be accepted, such as mm/dd/yyyy or yyyy-mm-dd.
- *Required for NEW Employees* Address 1: This will be in text format ex. “60 Harbor Drive.”
- *Required for NEW Employees* City: This is the employee’s listed city.
- *Required for NEW Employees* State: This is the employee’s listed state.
- *Required for NEW Employees* Postal Code: This is the employee’s listed zip code.
- *Required for All Employees* ESA Employee Contribution: This is the dollar amount each employee is deducting from their paycheck for their ESA during the pay period. You can retrieve this information from your payroll system after you run payroll. Copy over each employee’s savings amount from your payroll system into this column. Both commas and $ signs are accepted.
- If you’re using a file retrieved from your payroll system, don’t worry if the column header names aren’t an exact match with the required names. Vestwell will recognize a wide variety of nomenclature when you upload your file. If your column header is not identified, you'll be asked to correct it during the file upload process.
- If you have other columns on your payroll contributions file, that’s okay. These columns will be ignored during the file upload process. As long as all required columns noted above are in your file, you are set.
- Missing information or other errors in your file will prevent you from continuing with the upload process until all are corrected. When you upload your file, you'll be prompted to make corrections within the portal before file submission can be completed.
- Remember to save your file to ensure all changes you make are recorded before file upload.
3. Upload Your Payroll Contribution File
Once you have properly formatted and filled in your payroll contributions file—whether that be the downloaded Vestwell template or your own file—you will need to upload it to your ESA portal. On the “Contributions” tab, click Upload File and select your payroll contribution file from your device’s file manager or Finder application. Uploading can take a few seconds, so please be patient.
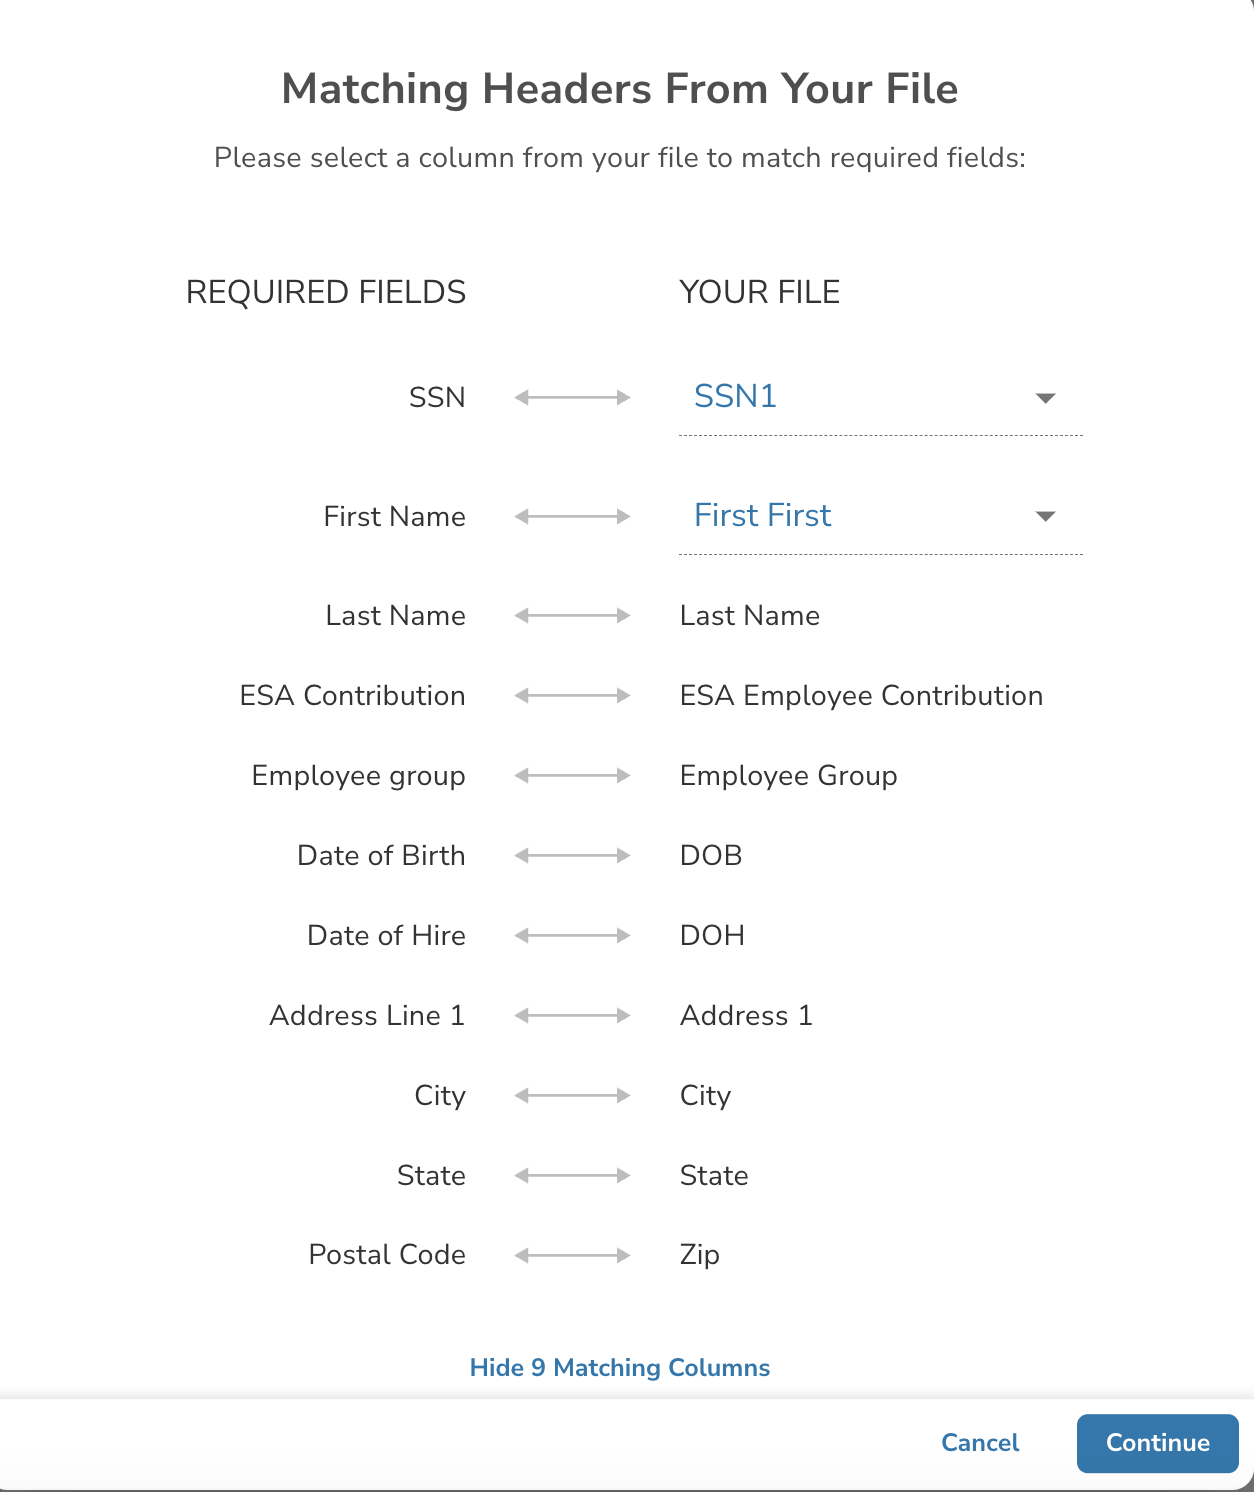
4. Map Any Unknown Column Names
If any required column names aren't recognized, you will be asked to map a column from your file to Vestwell's required column header names. For each header name, click the drop-down to select from the available column names in your file and match it to Vestwell’s accepted column name.
Note: If you’re not prompted to map any unknown header names, you can skip to step 5.
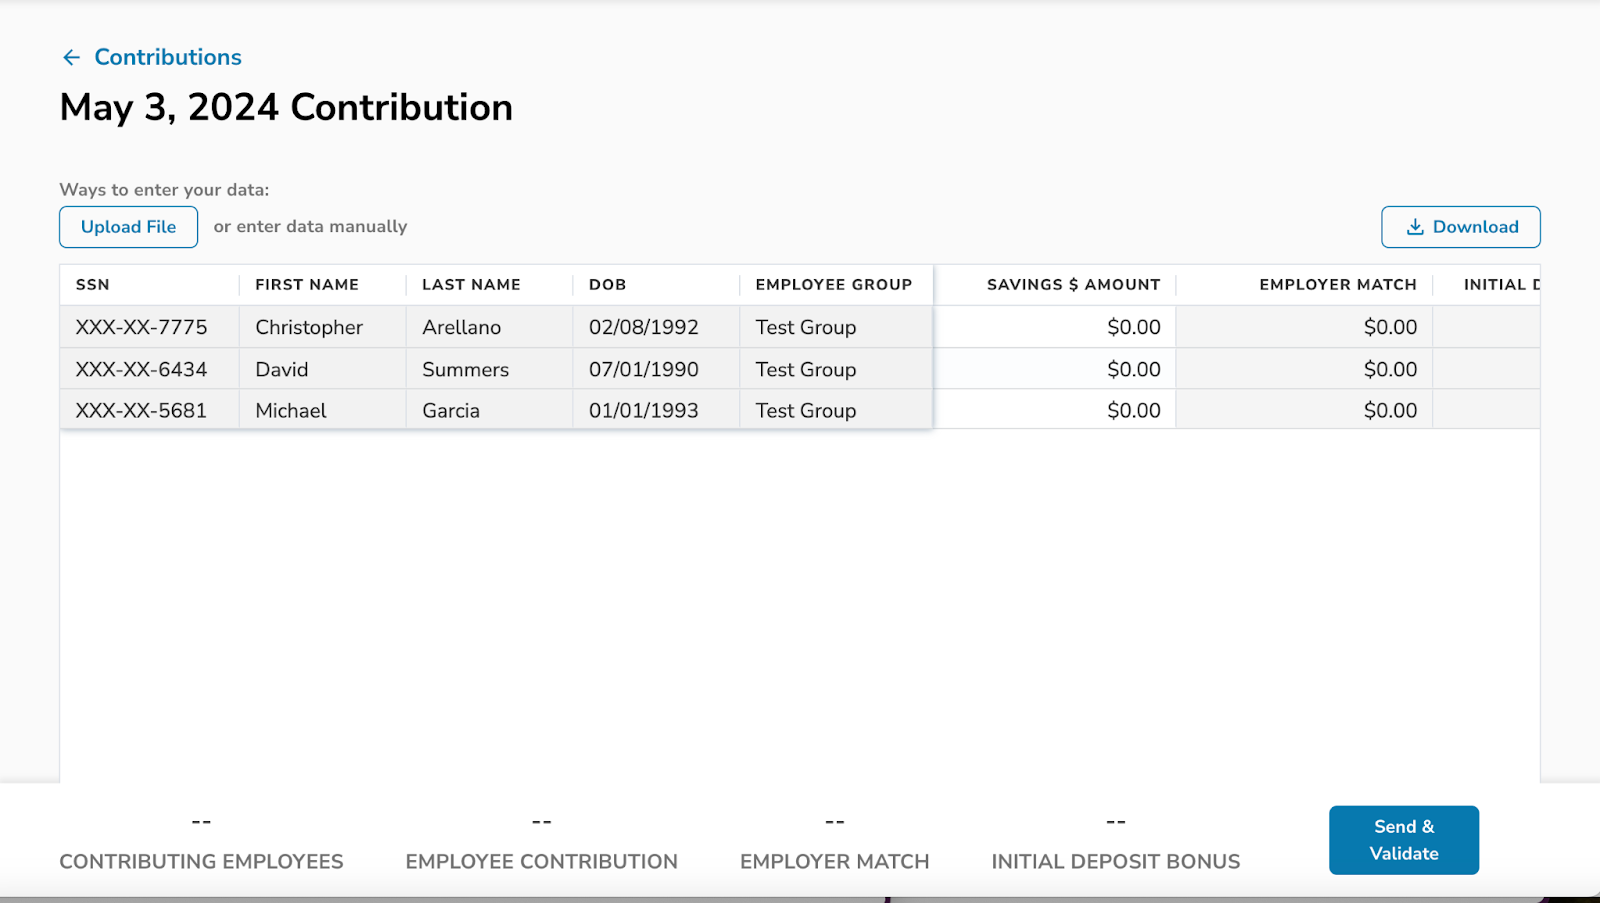
5. Review Your Uploaded Contributions Data and Any Automatically Calculated Employer Contribution Data
Now, you will have a chance to verify that the information displayed on your ESA portal from your uploaded file is accurate. The information from your file will be displayed in a grid format on your portal. You will also see three additional columns populated within the grid labeled “Employer Match,” “Initial Deposit Bonus,” and “Milestone Bonus.” If you offer any of these employer incentives within your program and they are applicable, the data within these columns will be automatically calculated based on the “Savings $ Amount” for each employee, as per below. If you do not offer any of these incentives, or if an incentive is not applicable for this pay period or employee, $0 will be shown.
Calculated Columns:
- Employer Match: If offered, this data is automatically calculated based on the appropriate match amount you offer each employee, given the match structure you have designed.
- Initial Deposit Bonus: If offered, this amount is automatically populated for your applicable employees making their first contributions this pay period. The amount is based on the incentive structure you have designed.
- Milestone Bonus: If offered and applicable, this amount is automatically populated for your applicable employees that hit a certain milestone amount in their ESA this pay period. The amount is based on the incentive structure you have designed.
As you review, you can sort any column on the contribution grid displayed on your portal by clicking on that column header. When you click, you will see an arrow pointing up or down. The “down” arrow will sort the column from greatest value to least value, and the “up” arrow will sort the column from least value to greatest value. Click again on the same column header to change the direction of the sorting.
At this stage, you will also be able to view the contribution totals summarized at the bottom of the screen. These represent the totals across all employees for the designated pay cycle.
- “Employee Contribution” shows the total ESA contribution amount made across all participating employees for this pay period. This is the total amount deducted from all employee paychecks towards saving in their ESA.
- “Employer Match” shows the total ESA match amount you are providing towards your employees’ ESAs for this pay period if you offer a match.
- “Initial Deposit Bonus” shows the total sign-up bonus amount you are providing for applicable employees that hit the initial deposit threshold you have set during program setup, if you offer an initial deposit bonus.
- “Milestone Bonus” shows the total milestone bonus amount you are providing towards your applicable employees’ ESAs if you offer one.
If any of the information you see on the portal is incorrect and you are unable to modify this data, reach out to clientsuccess@vestwell.com.
6. Send Your Contributions Data for Validation
Once you have reviewed the contributions data displayed on your portal and are satisfied, click the Send & Validate button to proceed. If the button is gray and unable to be clicked, this means you have missing or invalid information you will need to correct before proceeding.
7. Make any File Corrections (If Needed)
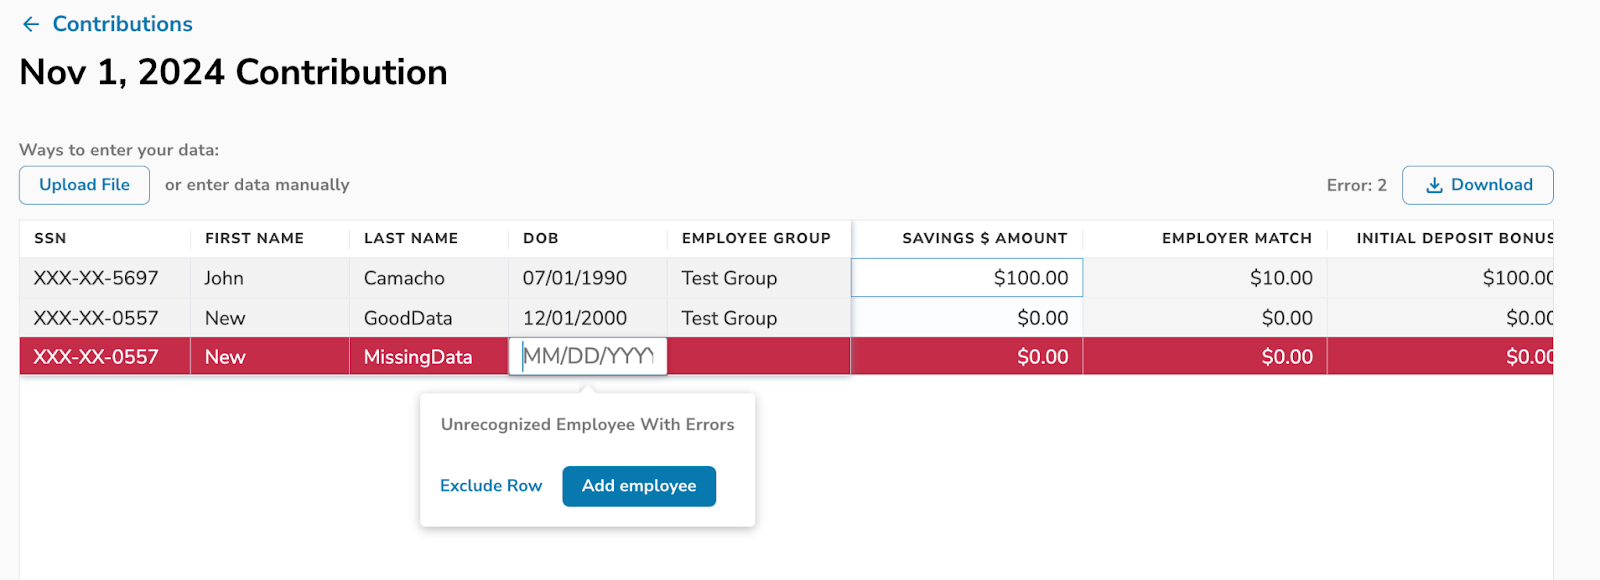
If errors exist in your uploaded file data, you will be instructed to make corrections. Any problematic fields will be highlighted in red, and you can only proceed to the next step once all red boxes and errors are resolved.
The error tracker next to the “Download” button will indicate the number of remaining errors that must be corrected. Make sure your error count is at 0 to proceed. Click on each red box to find out the correction required. You will have the option to resolve the issue or exclude the row in order to proceed. Errors found at this stage will be due to missing or poorly formatted data and newly added employees in your file that are unrecognized and have missing information.
Adding New Employees
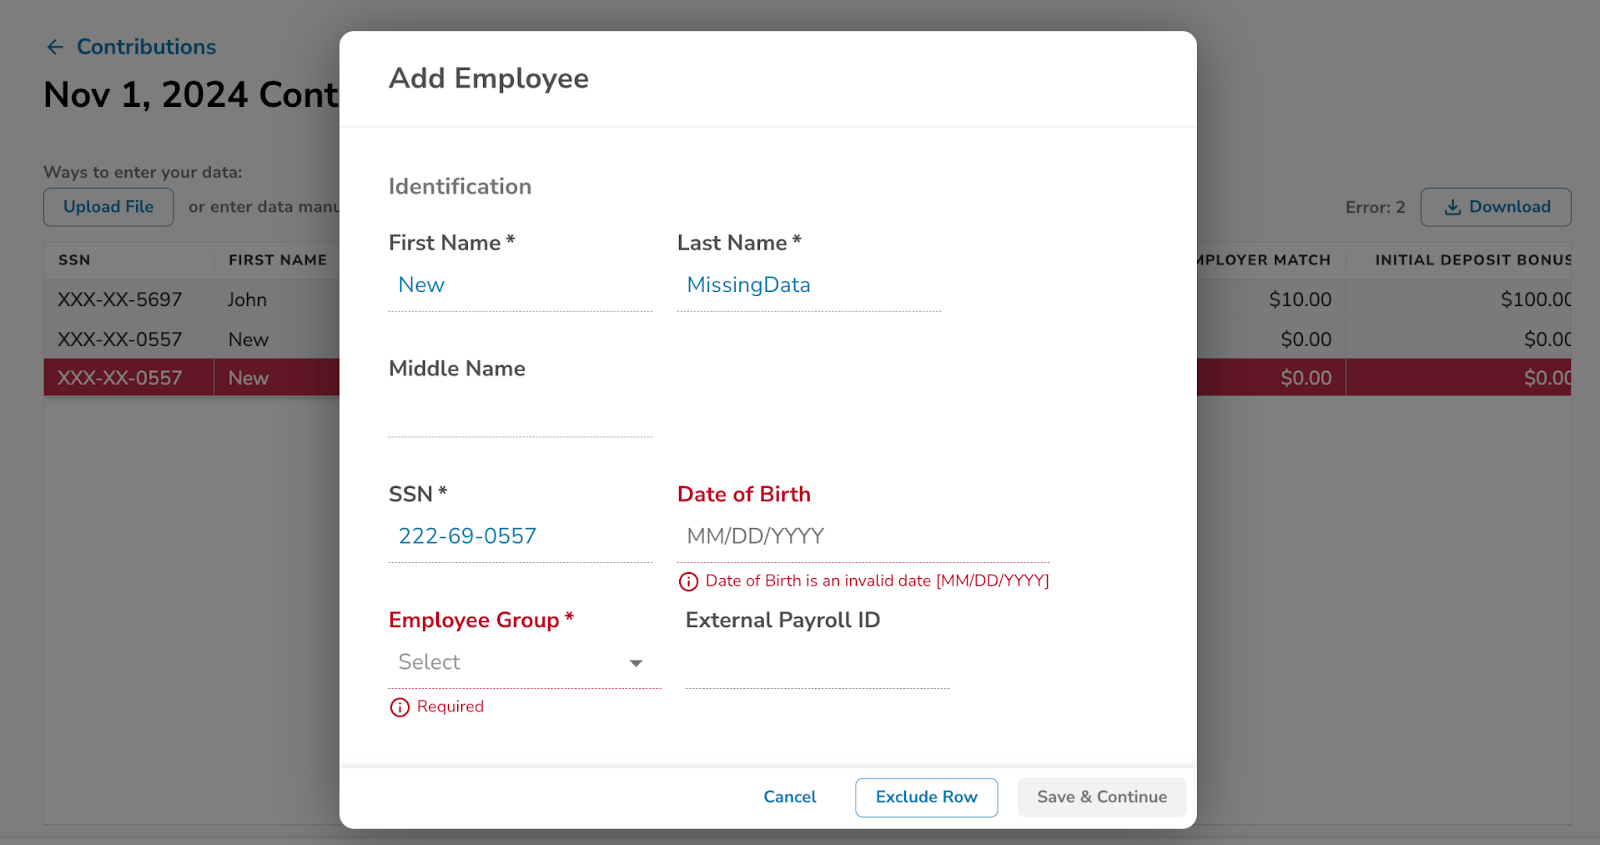
If your file contains any new employees and all required information is correctly provided, the new employees will be successfully added to your ESA program going forward with no additional actions needed.
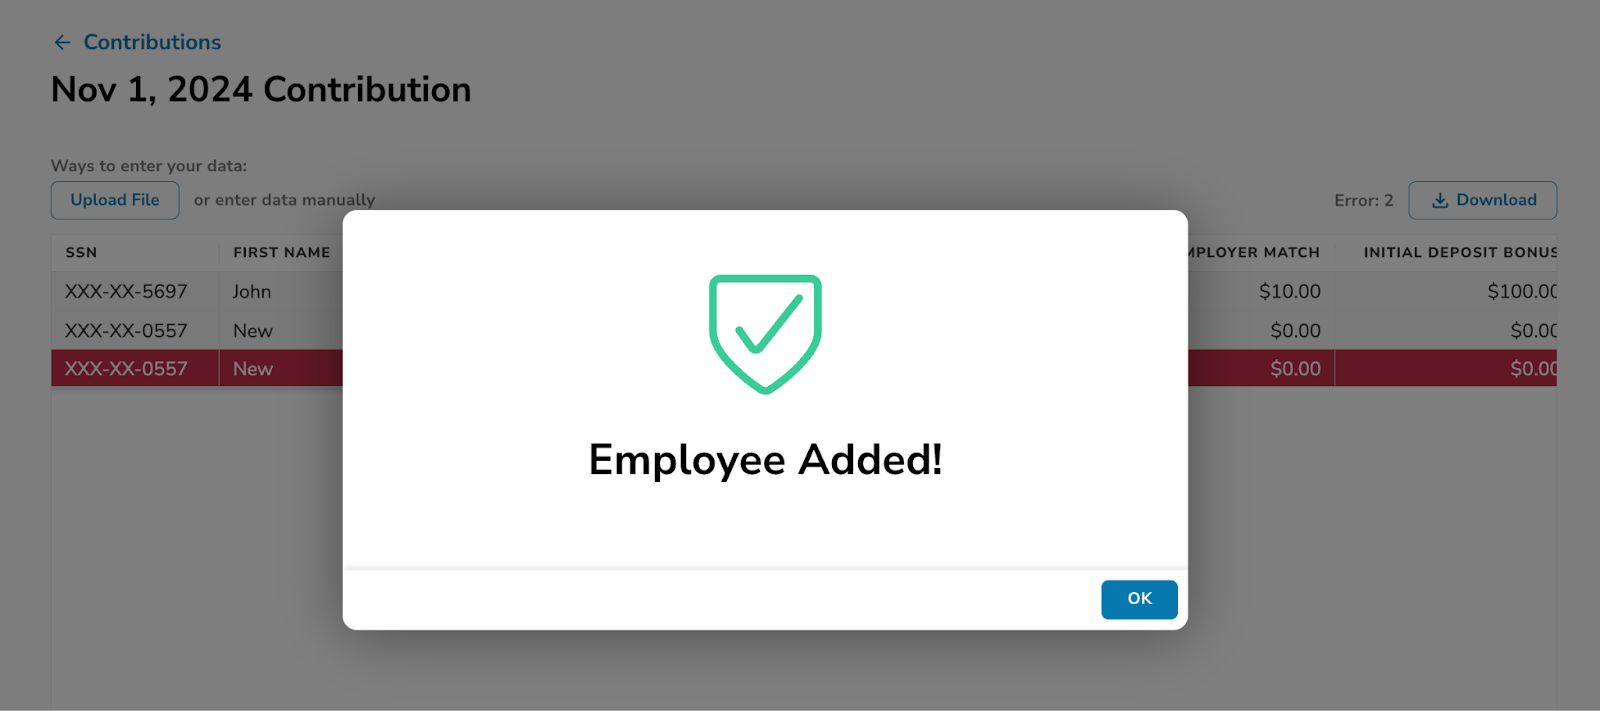
If you attempt to add a new employee and you are missing any required information, you will receive an error message to correct the missing data. You will be brought to a screen to add a new employee and prompted to enter all required data. Once you’ve provided all information for your new employee, they will successfully be added to your ESA program going forward.
Correcting Ineligible Contributions
During this validation step, we will also check to ensure that all contributions are associated with eligible employees. If any contributions on your file are associated with ineligible employees, these contributions will be rejected. An ineligible employee could be an employee who:
- Is younger than 18,
- Has not yet passed KYC verification processes, and/or
- Has not yet registered
Once you have resolved all errors, click the Send & Validate button again to proceed.
At any time, if you need any further assistance, you can reach out to clientsuccess@vestwell.com.
8. Perform a Final Review of Your Submission
You will now be brought to a “Review Submission” page for a final review of the contribution details you have provided for this pay cycle. This page will show a summary of the contribution details for this pay cycle, including the total contribution amount that will be deducted from your bank account. This total is inclusive of all employee contributions withheld from employee paychecks and any employer contributions. On this review page, you will have the opportunity to take several actions:
- You can click Edit Submission to go back and make further edits to the data.
- You can click Cancel Submission to delete the submission and start over.
- You can click Complete Submission once again to fully submit the contribution data.
If you click Complete Submission to complete your contributions data submission for this pay cycle, a confirmation screen will pop up confirming that you have successfully submitted your contributions data for further processing.

The submission process is now complete, and you can click the Back to Transactions button to return to the “Contributions” dashboard.
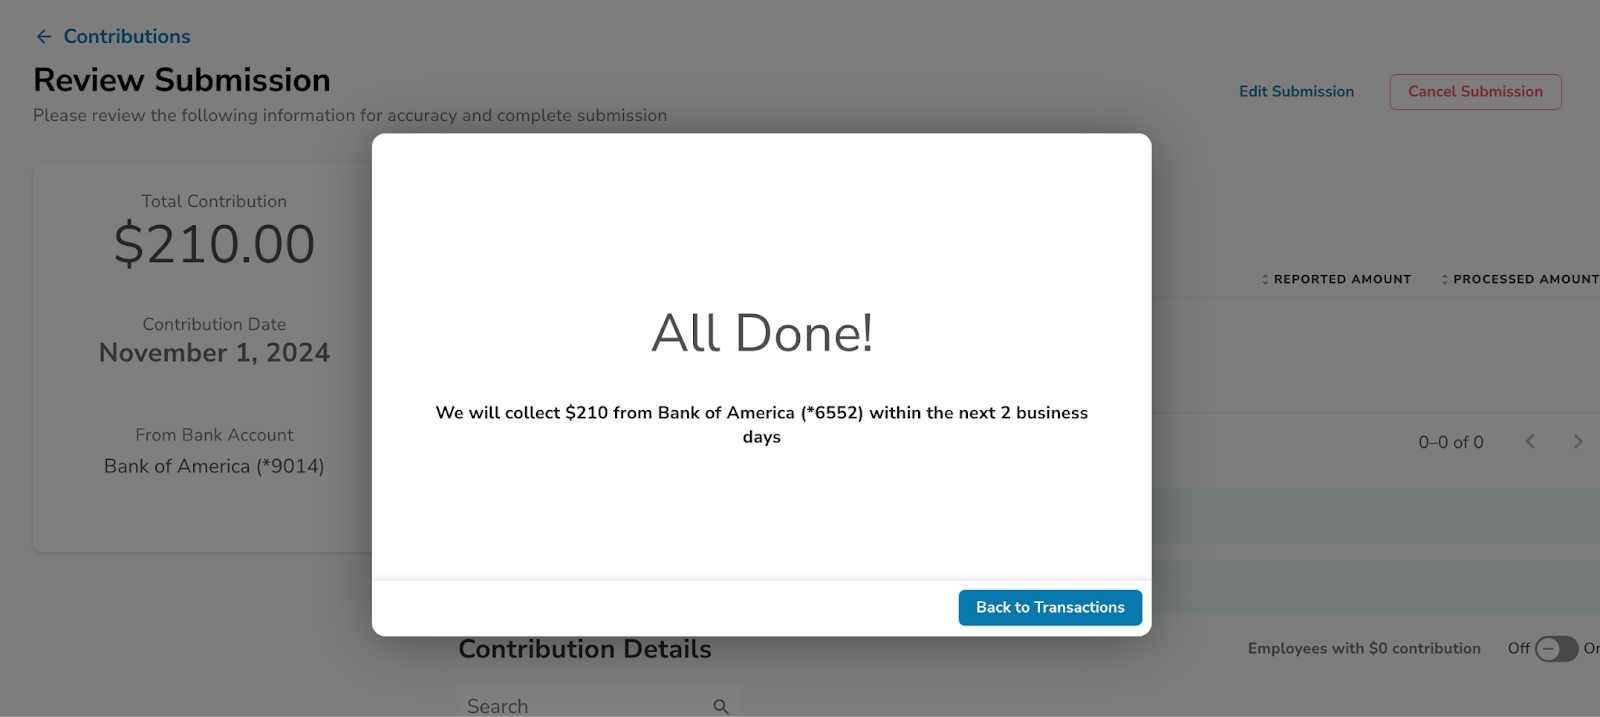
Even after you receive this submission confirmation, you will have 1 hour to cancel the submission if needed. You can do this by clicking on the three dots next to your submission on the contributions dashboard and choosing Cancel.
If you have any questions during your ESA payroll contribution submission process, you can reach out to clientsuccess@vestwell.com.